Video page
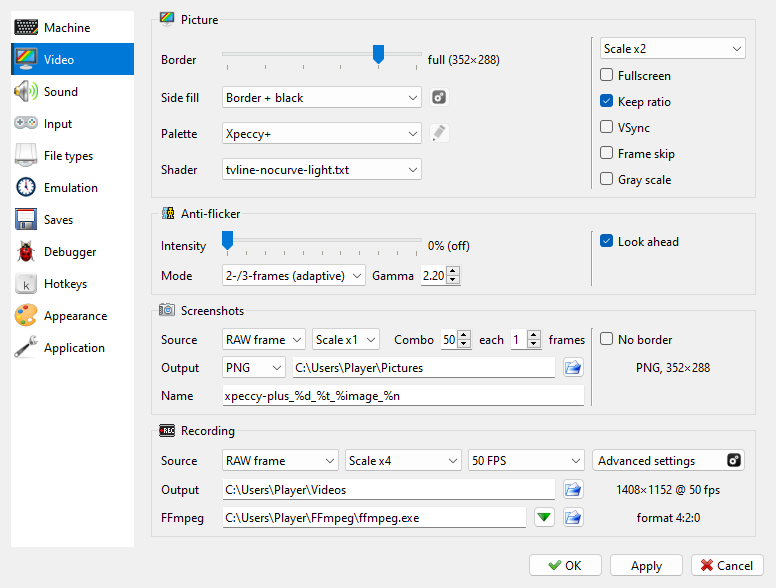
The page has four groups:
Picture - Border, Side fill, Palette with the
 button for
the Palette Editor, Shader, and on the right the window scale
(Scale x1 to Scale x6), Fullscreen, Keep ratio, VSync, Frame skip
and Gray scale. The scale, Fullscreen, Keep ratio, Side fill, the palette
and the shader are the same settings as in the View menu; see View menu.
For VSync see VSync, for Frame skip see Frame skip.
Anti-flicker - see Anti-flicker.
Screenshots - see Screenshots.
Recording - video recording through FFmpeg. See Recording.
Side fill
Side fill is what fills the room the picture leaves free in fullscreen or in a
maximized window: Border + black, Border + stretched edges, Border + mirror,
Black, Stretched edges or Mirror, the same choice as View > Side Fill
(see Fullscreen). The  button
beside it opens five sliders. The window shows every move at once, Defaults puts
every slider back where it starts, and Cancel puts back what was there.
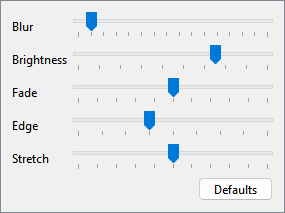
Blur - how soft the fill is, from crisp to a wide glow;
Brightness - how bright it is beside the picture;
Fade - how much darker it gets towards the screen’s edge;
Edge - how gently the picture runs into the fill;
Stretch - Mirror only: the reflection drawn out like pulled rubber - as it is by the picture, wider and wider towards the screen’s edge, its far part going off the screen; at the left end it is a plain one.
The button is grayed out with Black and Border + black. Without OpenGL only these two can be picked.
VSync
VSync in the Picture group waits for the screen’s refresh, so the picture never tears. It is off by default.
When the machine’s frame rate is close to the screen’s - within 4.5 % of it, or of a half or a third of it - the machine runs at the screen’s rate, and every frame stays on the screen for the same number of refreshes. Motion is then even: a ZX Spectrum Next at 58.15 Hz on a 60 Hz screen scrolls without the jerk it otherwise shows once or twice a second. The machine runs a few percent faster or slower than the real one, and its sound is as much higher or lower. While this is so, the status bar says VSync beside the frame rate, and a note on the picture gives the rate when it starts.
Screen |
Pentagon, 48.83 Hz |
48K, 50.08 Hz |
Next in 60 Hz mode, 58.15 Hz |
|---|---|---|---|
50 Hz |
50 Hz, +2.4 % |
50 Hz, -0.2 % |
own rate |
60 Hz |
own rate |
own rate |
60 Hz, +3.2 % |
100 Hz |
50 Hz, each frame twice |
50 Hz, each frame twice |
own rate |
120 Hz |
own rate |
own rate |
60 Hz, each frame twice |
144 Hz |
48 Hz, each frame three times, -1.7 % |
48 Hz, each frame three times, -4.2 % |
own rate |
At its own rate a machine is shown as without VSync, only without tearing: a 50 Hz machine on a 60 Hz screen moves as unevenly as it would on a 60 Hz television.
Fast forward, slow motion and rewind run at their own speed; the screen’s rate comes back after them.
A video recording is what you see: the Next above is recorded at 60 frames a second, at the sound’s new pitch. Without VSync it is recorded at 58.15.
On Windows, fullscreen with VSync goes through the desktop’s compositor, which adds the frame of delay that Low latency saves otherwise (see Input lag).
A screen with a variable refresh rate (G-Sync, FreeSync, Adaptive-Sync, ProMotion) shows each frame when it is ready, so VSync has nothing to add there; leave it off. On macOS the machine keeps its own rate on such a screen.
On Linux VSync needs OpenGL and takes effect after a restart.
Frame skip
Frame skip in the Picture group is for a computer too slow for the machine it runs. While the machine falls behind its own speed, a frame is now and then left undrawn: the machine runs it all the same, only the picture is not made, which takes much less time. The machine and its sound keep their speed, and the picture changes a little less often. It is off by default.
At most one frame in three is left undrawn, so a sprite that flickers on every other frame still shows both of its pictures.
While the computer keeps up, every frame is drawn.
Every frame is drawn at a speed other than normal, while a video is recorded, with run-ahead (see Input lag), in the debugger, and while a breakpoint may stop the machine.
While frames are being left undrawn, Anti-flicker is off: the computer is short of time already. It comes back a few seconds after the last frame left out.
When the machine runs well under its frame rate for a few seconds at normal speed and Frame skip is off, Xpeccy+ offers to turn it on - not where Frame skip would draw every frame anyway (the cases above). Not Now asks again on the next start, Don’t Ask Again never.
Anti-flicker
Some programs show more colors than the machine has by switching between two or three pictures every frame. On a CRT television this looked like one steady picture; on a modern screen it flickers. Anti-flicker blends the frames together again. Its settings are in the Anti-flicker group of Options > Video:
Intensity - how much of the previous frames is mixed into the picture. 0% (off) turns anti-flicker off; it is off by default.
Mode - which pixels are blended, and how many frames; see the table below.
Gamma - how the colors are mixed. 2.2 is close to a CRT; 1.0 mixes them linearly. Values from 1.8 to 2.4 are usual.
Look ahead - only for the adaptive modes: the machine runs two frames ahead in the background, so a flicker is recognized sooner after it starts. It costs some extra CPU time.
“Fullscreen” in the names of the modes means the whole picture, not fullscreen view:
Mode |
What it does |
|---|---|
2-frames (fullscreen) |
Every pixel that changed since the last frame is mixed with its color in that frame, all over the picture. Good for a still two-frame picture; a moving picture gets trails. |
2-frames (adaptive) |
Only the pixels that keep alternating between the same two colors for several frames are mixed. Moving parts stay sharp. |
3-frames (fullscreen) |
The last three frames are mixed everywhere, for pictures made of three frames in turn (red, green and blue). |
2-/3-frames (adaptive) |
Finds both kinds by itself - three-frame pictures and two-frame flicker - and leaves everything else alone. The default. |
The Anti-flicker action switches the intensity in turn between 50%, 100% and off, and the picture shows which one. Its key is set on the Hotkeys page of Options.
Anti-flicker is not applied in fast mode. What the modes look for, and where anti-flicker is better left off, is in Anti-flicker of Under the Hood.
Screenshots
The Screenshots group on the Video page of Options:
Source - RAW frame takes the machine’s picture alone, with no shader. Screen takes the picture as the window shows it, shader and all, as big as it is there, with the Side fill beside it when there is one (black around the picture is left out); the indicators and messages over it are left out too. Screen needs the OpenGL view. RAW frame by default.
Scale x1 … Scale x4 - the size of a RAW frame picture. Scale x1 gives one pixel for each dot of the machine: 256×192 for the screen alone, more with as much border as the Border slider shows. A picture in a high-resolution mode (Profi, ATM and ZX Evo text and hi-res modes, the ZX Spectrum Next’s 640-dot Layer 2) keeps all its dots, with every line twice so that it is not squashed: 512×384 for a 512-dot screen. Scale x1 by default.
Combo … each … frames - how many pictures Screenshot Series takes, and how many of the machine’s frames apart.
Output - the kind of file (see below) and the folder for the files; the
 button picks the folder. Your home folder by default.
Name - the file name template, the same as the video’s (File name template) with one more key,
%n: a number,001,002and so on, the first one not taken in the folder. Empty, it isxpeccy-plus_%d_%t_%image_%n. With%image %nthe shots of a game are numbered after it:Tetris GB 001.png,Tetris GB 002.png.No border - the screen only, without the border around it.
Under No border are the format and the size a picture comes out at with the settings on the page, such as PNG, 352×288; a high-resolution picture comes out twice as big.
Format |
What is saved |
|---|---|
PNG, BMP, JPG |
the picture, as Source and the size say |
SCR |
the 6912 bytes of the machine’s screen memory, to load back on a Spectrum |
Hobeta |
the same screen memory as a Hobeta file ( |
SCR and Hobeta hold only the standard Spectrum screen. In another video mode (Profi, ATM, ZX Evo and TSConf modes of their own, the ZX Spectrum Next) no file is saved and the message says not the ZX screen: no SCR.
Recording
The Recording group on the Video page of Options:
Source - RAW frame records the machine’s picture alone, with no shader and no indicators. Screen records the window as you see it, shader and all.
Scale - how many times bigger the video is than the machine’s picture, from Scale x1 to Scale x8 (for RAW frame only).
Real FPS or 50 FPS - Real FPS records at the machine’s own frame rate, which on most machines is a little different from 50. 50 FPS records at exactly 50 frames per second, and the sound is adjusted to match.
Output - the folder for the videos; your system’s videos folder by default.
FFmpeg - see Getting FFmpeg.
The size and frame rate of the video are shown beside these settings. The Border setting of the Picture group changes the size too.
Advanced settings opens Recording: Advanced Settings:
Video - Container (MP4 or MKV), Codec, Preset (slower makes a smaller file, but can slow the machine down), Quality (CRF) (lower is better; 18 looks lossless), Color, and Blend up to 60 fps. The codecs are H.264 and H.265, AV1 and the graphics card encoders (NVENC, AMF, QSV) when your FFmpeg and computer can use them, and FFV1, lossless, which is always saved as MKV.
Sound - Codec (Auto, AAC or Opus) and its bit rate. Keep pitch at 50 FPS keeps the notes in tune when 50 FPS speeds the sound up a little.
File name template - the name of the video file; the name it gives right now is shown under it.
Auto recording - see below.
FFmpeg - Extra options for the encoder, Video override and Sound override to replace the options Xpeccy+ sets, and the whole FFmpeg command as it will run.
The file name template can contain these keys:
Key |
Becomes |
|---|---|
|
the date, |
|
the time, |
|
the name of the file in use (snapshot, tape, disk or divMMC card), or the machine’s name when there is none |
|
the machine’s name |
The default is xpeccy-plus_%d_%t_%image. The name is made when the recording stops, so
%image is the last file that was in use.
Auto recording
Auto recording starts and stops a video by itself, to catch a demo or a game from its first frame.
Autostart at - starts a video when the condition is met: Code in RAM (the first program code the machine runs from RAM, which is where a loaded program starts), or the CPU reaching an address: PC ==, PC >= or PC <=, with the address beside it (
#8000,$8000,0x8000or32768). A video is started this way once after each reset. When you turn this on in Options, it waits for the next reset.Autostop at - stops any video, including one started by hand: at a Reset, or when the CPU reaches an address as above.
Record Video used by hand always overrides these settings: after a video is started or stopped by hand, auto recording does not start one again until the next reset.
The ? button lists the command-line switches for recording:
--video-out <file>- record from the start into this file;.mp4or.mkvpicks the container.--video-auto,--no-video-auto- turn auto recording on or off for this run, with the conditions set in Options.--video-autostart <at>,--video-autostop <at>- the conditions for this run:ram,reset, or an address such as==#6000or">=#8000".
They hold for that run only. See Command line.