Screen panel
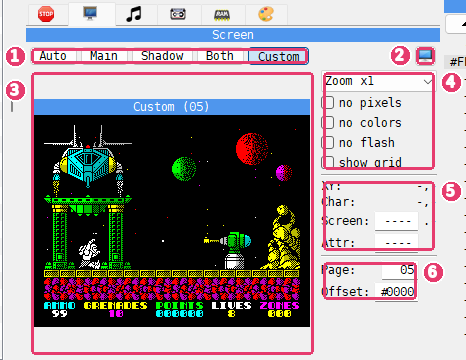
Mode - Auto, Main, Shadow, Both or Custom: which screen is drawn.
 Show in its own window - moves the panel into the Screen window.
Picture - the screen, with a strip of the border color around it and its name above it.
View - the zoom and four check boxes that change how the picture is drawn.
Readout - where the dot under the mouse is and which bytes hold it.
Page and Offset - only in Custom mode: which memory to draw.
The panel draws a ZX screen of 256 x 192 dots from memory: 6144 bytes of pixels and 768 bytes of attributes, in the standard layout. It draws that layout whatever video mode the machine is in, so it always shows what a ZX screen at that place in memory would look like.
Which screen
Button |
What it draws |
|---|---|
Auto |
the screen the machine is showing now; it follows a program that flips between two screens |
Main |
the normal screen, RAM page 5 |
Shadow |
the second screen of a 128K, RAM page 7 |
Both |
page 5 and page 7 side by side, or one above the other in a tall panel |
Custom |
any 16K page, from any offset in it |
Shadow and Both are grayed out on a machine with no page 7, such as the 48K.
The name above a picture says where it comes from: Main (5), Shadow (7), or Page with a number for any other page. In Custom mode it is Custom with the page number. The name of the screen the machine is showing is in the Header color of the Debugger page of Options; the other one is plain.
In Custom mode, type the page into Page and the place in the page where the screen starts into Offset, both in hex. Offset goes from 0000 to 3FFF. Use Custom to look at a picture a program keeps elsewhere in memory, for example one it copies to the screen later.
How it is drawn
Setting |
What it does |
|---|---|
Zoom Fit |
fills the panel; when there is room, each dot takes a whole number of pixels |
Zoom x1 to Zoom x4 |
a fixed number of pixels per dot |
no pixels |
attributes only: each cell is its paper color with a small dot of ink in the middle |
no colors |
pixels only, white on black |
no flash |
holds flashing cells still; grayed out while ULA+ is in use |
show grid |
dims every other 8 x 8 cell, so the character cells can be counted |
Finding a dot
Move the mouse over the picture. The readout shows:
Field |
What it shows |
|---|---|
XY: |
the dot, in pixels from the top left corner: 0 to 255 across, 0 to 191 down |
Char: |
the character cell, 0 to 31 across, 0 to 23 down |
Screen: |
the address of the byte that holds the dot, and after it the bit: |
Attr: |
the address of the attribute byte that colors the dot’s cell |
The addresses are the ones the CPU uses. The addresses of page 5 start at 4000, where this page always is in memory. The addresses of any other page start at C000, where a 128K pages it in.
Click the picture to hold the readout on a dot: the cell is marked, and the numbers stay while you move the mouse away. Click again to let go.
Right-click the picture for Copy screen address and Copy attribute address. They copy the address of the dot under the mouse, or of the held dot, as four hex digits.
The readout works the other way too: type an address into Screen: or Attr: and the cell it belongs to is marked on the picture. Move the mouse back over the picture to make the readout follow the mouse again.
Examples
See which screen a 128K program draws to
A 128K has two screens, in RAM pages 5 and 7. Many programs draw on the screen that is not shown and then flip, so that the picture never shows half drawn.
Choose a 128K machine and load the program.
Choose Tools > Screen. The Screen window opens.
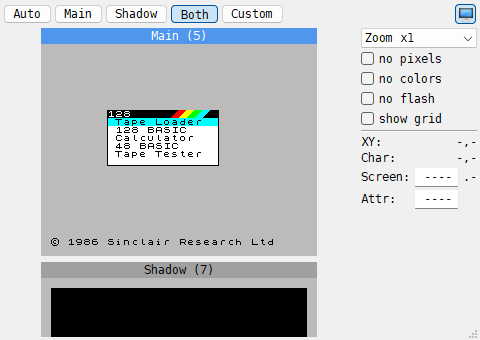
Click Both. The window shows Main (5) and Shadow (7) together.
Let the program run. The name of the screen the machine shows is in the Header color; when the program flips, the other name takes that color.
You see the hidden screen being drawn while the other one is shown. Click Auto to see only the screen the machine shows, the way the main window does.
Find the bytes behind a spot on the screen
Open the Debugger and click the Screen tab.
Move the mouse onto the spot and click: the cell is marked and the readout stays on it.
Read Screen: for the byte of pixels and Attr: for its colors, for example
#4000and#5800for the top left corner.Right-click the picture and choose Copy screen address.
With the address in hand, look at the byte in the DUMP panel (see DUMP panel), or set a Write breakpoint on it to stop the machine when the program draws there (see Breakpoints panel).