Disasm panel
The Disasm panel of the Debugger shows memory as Z80 instructions, the way the CPU sees it now. You can move through it, change bytes and instructions, give addresses names and leave comments, and say which parts of memory are data rather than code.
The Disasm panel
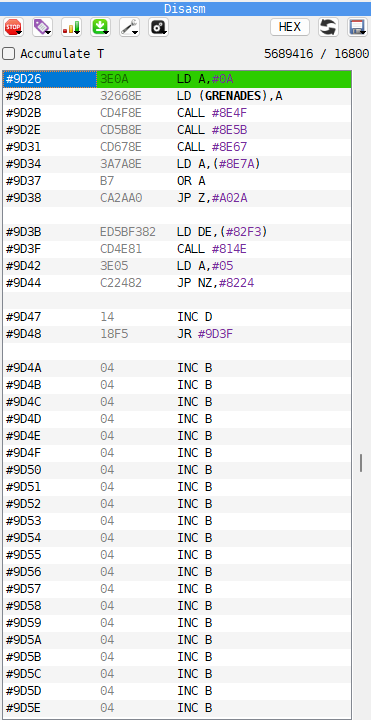
Toolbar - menus of commands, described in The toolbar.
Accumulate T and the T counter - see The T-state counter.
Listing - one row per instruction or line of data.
Scrollbar - drag it to move through the whole address space.
The listing
Each row has four columns:
Column |
What it shows |
|---|---|
Address |
where the row starts in memory |
Bytes |
the bytes of the instruction or data, in hex; a long data row shows those that fit, then |
Command |
the instruction, or |
(last) |
on the PC row only: the value in memory, or an arrow |
Numbers are hex and start with #, as in LD HL,#5C00, unless you pick another form: see
Hex or decimal. Where an address has a name, the name is shown instead
of the number: CALL print_score. An address a few bytes into a
named place is shown as the name plus the offset: LD A,(table + 2).
Some rows are not instructions:
a label row, in bold on a tinted background, names the address of the row under it. In a local label such as
draw.loop, under the labeldraw, thedrawpart is paler. It is paler in an instruction too, when the instruction is indraw’s block - afterdrawand before the next label that is not a local one;a comment row, in gray, starts with
;;an
EQUrow follows an instruction when a label points inside it:NAMEwithEQU $-2says the label is two bytes before the next instruction. Programs that change their own code use such labels;an empty row follows every return and jump, conditional ones too, to set the blocks of code apart. Block separator in the
 Options menu switches these
rows off.
The row the CPU will run next, at PC, has its own color. Rows with a breakpoint have their text in the breakpoint color, and a selected block has its own color too. The colors are set on the Debugger page of Options.
The rows show memory as the fetch at PC pages it. With PC at 3D00-3DFF and the BASIC ROM
in, the whole listing shows the TR-DOS ROM of a Beta Disk interface, or the ROM of a
divMMC; with PC in RAM, the BASIC ROM, since TR-DOS is paged out there. A divMMC
entry point such as 0008 pages the board in for the fetch after it, so the listing shows the
board after the step from 0008.
The last column says more about the instruction at PC:
for an instruction that reads or writes memory, such as
LD A,(HL)orLD (#5C3A),HL, the byte or word at that address now;for a conditional jump, call or return whose condition is met, an arrow: down when the jump goes to a higher address, up when it goes to a lower one. The row the jump goes to, if that row is in view, gets an arrow too.
Hex or decimal
Addresses, and the numbers in the commands of the listing, are written in one of four forms, picked by Number format on the Debugger page of Options:
Form |
An address |
A byte |
|---|---|---|
|
|
|
|
|
|
|
|
|
|
|
|
The button at the right of the toolbar shows the base, HEX or DEC. A click on it switches between hex in the form picked and decimal, and so does Ctrl+Shift+H (Decimal numbers in Debugger keys). The choice is kept between sessions.
An address takes five characters in any form, so the columns stay put: in decimal it is
padded with spaces, never zeros, 56. The numbers in commands are not padded:
LD A,201, JR 13986, RST 56.
The addresses in the other panels follow the switch too: DUMP, REG-DUMP, the
disk dump of the FDD panel, STACK (its words as well), the Breakpoints and
Labels List lists, the Watcher, the Heat map, and the address and length
fields of Save dump, Load dump, Fill…, Sprite scanner and the Screen
panel. A page number in front of an address stays hex, as MEMMAP shows it:
05:#0123 or 05: 291. The registers of the CPU panel and the Watcher follow it
as well (see CPU panel), and so do the port numbers of PORTS and of
the Breakpoints list. The bytes of the listing and the dumps, the mask of a port and the
panels of the hardware stay hex.
Typing a number
The fields that take an address read a number the same way, whatever the form:
You type |
It is |
|---|---|
|
hex |
|
decimal |
|
decimal 100: a leading zero means nothing |
a name |
a label |
In a hex form a field opens with its address in that form, #8000, and the sign stays
while you type over the digits: select all and type C000, and it is #C000. Backspace
or Delete on the sign itself takes it off, and the number you type then is decimal. In an
empty field the sign comes with the first digit. A first character that is not a hex
digit - a label, .HL, the ; of a comment - replaces the lot. In decimal nothing is
added: type # or $ first for hex.
The fields of Save dump, Load dump, Fill…, Sprite scanner and the
Screen panel keep to their digits, and the sign is drawn beside them. Backspace in
front of the digits switches such a field to decimal, # or $ back to hex, and X either
way.
While you type an address, a tip under the field shows what it is: its label, if it has one, then the number in hex, decimal and binary:
P_RAMT
HEX: #5CB4
DEC: 23732
BIN: 01011100 10110100
Rest the mouse on an address of the listing, or on a number or a label in a command, for the same tip, over the number.
A byte of DUMP, REG-DUMP, the disk dump of the FDD panel and CMOS has it too, with where it is, its label, and the word read from it, low byte first:
#5CB4  P_RAMT
HEX: #FF (WORD: #FFFF)
DEC: 255 (WORD: 65535)
BIN: 11111111
The place of a disk byte is its track and offset, 00:#0040, and of a CMOS byte its
address, CMOS #0E; neither has a label. A tip left open follows the value while the
machine runs or steps. Number tips (see The Options menu) turns
these tips off; the one under a field being typed into stays.
Moving around
The listing follows the cursor:
Key |
What it does |
|---|---|
Up, Down |
move the cursor one row; at the edge the listing scrolls by one instruction |
Ctrl+Up, Ctrl+Down |
scroll by one byte, to line up instructions that start elsewhere |
PageUp, PageDown |
scroll one page up or down |
mouse wheel |
scroll by one instruction; with Ctrl, by one byte |
These commands have keys of their own, listed in Debugger keys:
Go to address - G in both presets. The address cell of the top row opens for typing: type an address and press Enter.
Jump to PC - back to the instruction at PC.
Set PC - PC becomes the address of the cursor row: the CPU goes on from there.
Jump to operand - goes to the address the instruction on the cursor row refers to: the target of a
JP,JRorCALL, or the address inLD HL,(#5C3A).Return - goes back to where you were before the last jump. It steps back through every Jump to operand, typed address, label picked in the Labels List and register clicked in the CPU panel.
Bookmark 1 to Bookmark 5 remember the address at the top of the listing; Go to bookmark 1 to Go to bookmark 5 take the listing back to that address. Bookmarks are not kept when the program closes.
A click on a register’s name in the CPU panel takes the listing to the address the register holds. A right-click on the name does the same for the DUMP panel (see DUMP panel).
Typing an address
Double-click the address of any row, or select it and press Enter, and type where to go. The listing scrolls so that the address lands on that row. An address can be:
You type |
It means |
|---|---|
|
a hex address |
|
a decimal address |
|
the address of a label |
|
the label’s address, and never a new label |
|
the address a register holds: |
The cell opens with the address in the form the listing shows; how the sign behaves while you type is in Typing a number. A name that is not a label yet makes a new label instead: see Labels and comments.
Editing
Double-click a cell, or select it and press Enter, to change it. Enter applies the change, Esc leaves the cell as it was.
Bytes - type the new bytes in hex, two digits each, with no spaces: 3E05 writes 3E
and 05 from the address of the row on.
Command - type an instruction, such as ld a,5 or call #8010. It is assembled and
written at the address of the row, and the cursor goes down to the next row, ready for
the next instruction. Write hex numbers with a sign - #8010, $8010, 0x8010 or
8010h: a plain number is decimal. A command opens in the form the listing shows, so it
can be changed as it stands.
Labels can be used in the instruction, alone or in a sum: jp loop, ld hl,table+2,
ld a,(ix+offset). An instruction that cannot be assembled writes nothing, though the
cursor still moves down: check the row before you go on.
You can also type data in the command column:
You type |
It writes |
|---|---|
|
one byte, shown as data |
|
the text, shown as text |
|
the text with bit 7 set in its last character, shown as text |
|
a word, shown as a word |
|
the label’s address, shown as an address |
ROM is protected: changes to a ROM address are not written unless Allow ROM wr in the
Options menu is ticked. A cartridge is never written.
Labels and comments
A label is a name for an address. Labels show in the listing on a row of their own and in place of the addresses in the instructions, and they can be typed wherever an address is asked for: in the listing, in the DUMP panel, in breakpoints.
To add a label, double-click the address of the row and type the name. A name starts with
a letter or _, and has no spaces and no $. If the row already has a label, that label
gets the new name. A name that reads as a hex number, such as FADE or C0DE, is taken as
an address: start such a name with _.
To add a comment, type ; and the text in the address cell: ; draws the score. The
comment shows on a gray row above the address.
To remove a label or a comment, open the address cell of the row it is shown on, clear the cell and press Enter.
The  Labels menu of the toolbar has:
Show labels - shows or hides the label rows in the listing. The names inside the instructions are shown either way. The Switch labels key does the same: Ctrl+L in both presets.
Load labels - reads a labels file.
Save labels - writes the labels in effect to a file.
Labels list - opens the Labels List.
Labels offered as you type
When you type a name in the address or command column, after the second letter a list of
the labels that contain those letters drops down. In the command column it comes in the
operands only: not for the command itself (RET is not taken for RETURN), nor for a
register or a condition (HL, NZ); type on and it comes back. Enter picks the label you typed in full,
else the first one that starts with your letters, else the first one; pick another with the
arrow keys or the mouse. The same list appears in the
The Breakpoint Editor.
Label files
A labels file holds one label per line: the RAM page, a colon, the address, and the name. The page is a decimal number, as SjASMPlus writes it. On most ZX machines the pages are 16K:
02:8010 print_score
00:DA00 level_data
SjASMPlus writes such a file with its LABELSLIST directive. Only the offset inside the
page counts, so 02:0010 is the same label as 02:8010. A line can also leave the page
out, as in :8010 print_score: the page is then 5 for an address from 4000 to 7FFF, 2 from
8000 to BFFF and 0 from C000 to FFFF.
On a ZX Spectrum Next the pages are 8K, as in SjASMPlus’s DEVICE ZXSPECTRUMNEXT:
17:0010 is offset 0010 in page 17 (MMU value 11 in hex), and 223:0000 is the last page.
Labels in the listing and physical breakpoints belong to those pages. A label used as a CPU
address follows the current MMU mapping; when its page is not mapped, that CPU address is
unknown. A RAM addr watch can still read it. A line without a page, such as
:8010 print_score, keeps its CPU address regardless of paging.
The pages are read the way the machine in use has them. A file made for a 128K, loaded on the Next, is read as 8K pages, and the event log warns about it when an offset does not fit.
SjASMPlus’s CSPECTMAP file loads the same way. Its lines carry each label’s address across
all of the RAM, so a label lands on its page on any machine. Values defined with EQU
are left out.
Load labels reads a file into a set of labels named after the file, and makes that set
the one in effect. Save labels writes the set in effect in the same form. A label in
other memory is saved with that memory’s name, as ROM0:0038 or DIV3:0010, and loads
back to the same place. Only Xpeccy+ reads such lines.
Labels typed in the listing go into the set in effect, or into a new set called noname
when there is none.
ROM labels
Known ROMs come with labels of their own, with no file loaded: LD_BYTES at 0556 of the
48K BASIC, the routines of the 128K editor (ROM 0) and of the four +2A/+3 ROMs, DOS_OPEN
in the +3DOS, and TR-DOS’s routines, tables and messages under the names of Marcos Cruz’s
disassembly (TRDOS_ENTRY_EXECUTE_COMMAND_IN_C at 3D13, READ_SECTORS,
CLI_COMMAND_FORMAT). The names are also in the
copies of these ROMs in the +2 and the clones (the Pentagon, Scorpion, Profi, ATM, ZX Evo);
a routine a clone changed has no name there. A ROM is known by its contents, so a ROM file
of yours with the same bytes has them too.
Each name belongs to the system it is part of: BASIC48 (the 48 BASIC, in every machine
that has it), BASIC128 (the 128K editor), P3ROM0 and P3ROM1 (the +2A/+3 editor),
P3DOS, TRDOS. Its full name is BASIC48.LD_BYTES; LD_BYTES alone does too, unless a
label of yours has that name. A short name that several systems in the machine have is the
one whose ROM is paged in now: on a +2A/+3, LD_BYTES is P3ROM1.LD_BYTES while ROM 1 is
paged in and BASIC48.LD_BYTES while ROM 3 is, and a condition with it follows the paging
as the program runs. While none of them is paged in, or two (an ATM Turbo 2 can page in two
ROMs at once; give the full name there), it equals no address in a condition: PC == LD_BYTES is false, PC != LD_BYTES true, and the rest of the condition counts as written.
Typed into an instruction then, it is an error that names them: START with ROM 2 paged in
names P3ROM0.START and BASIC48.START. The listing shows the short name, and the full
one, the system’s part paler, where the short one would mean something else now; a tip over
it shows the full name.
The ROM lists also say which parts of the ROM are data, and those are shown as data where
you have marked nothing yourself: the 48K’s character set at 3D00 as DB rows, the keyword
and message tables as DC "..." (text whose last character has bit 7 set), the report code
after an error call as DB, so the instructions after it line up. A mark of yours wins, and
the ROM’s marks are not saved in a memory map.
System variables are named in instructions too: LD HL,(CH_ADD), not LD HL,(5C5D).
They are the names of the manuals for the 48 BASIC (5C00-5CB5), the 128K and +2 (5B00-5BFF),
the +2A/+3 (its own 5B00-5BFF), and the TR-DOS variables as Marcos Cruz names them (from
5CB6: TRDOS_VARIABLE_FILENAME, TRDOS_VARIABLE_ERROR_CODE…), each where that system’s
ROM is in the machine. A
variable is never a row of its own, as memory there may be used for other things. They can
be typed as other names: BASIC48.ERR_SP, or ERR_SP.
They work as other labels do: in the listing, typed as an address, in breakpoints and
conditions. A ROM that is not paged in still has its place, for a label of yours in it
too: CALL READ_SECTORS and DW READ_SECTORS are 1E3D from BASIC too, and so is
READ_SECTORS typed as an address - the dump then shows what is paged in there now. A
condition such as PC == READ_SECTORS, or a breakpoint on it, holds only while that ROM is
paged in.
Your labels come first. A label of yours of the same name is the one an address or an
instruction gets, and one at the same address is shown instead. A ROM label’s name typed in
the address column makes a label of yours, as a new name does; @LD_BYTES goes to the ROM’s
LD_BYTES (on a +2A/+3, of the ROM paged in now). A ROM label cannot be removed, and Save
labels does not save it. ROM labels on the Debugger page of Options switches
the names and the data marks off, System variables the variables. Where they come from,
and their licenses, is in config/labels/README.md beside the program.
A program can also come with its labels. With Auto-load labels ticked on the
Debugger page of Options, opening a file also loads the .labels file of the same
name from the same folder. These labels are in effect until the next file is opened. See
Opening a file. From the command line, -l loads a labels file (see
Command line).
The Labels List
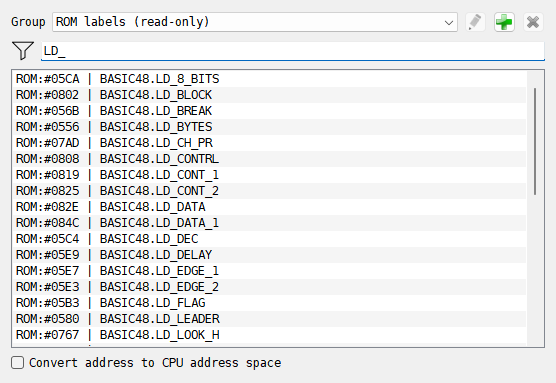
Labels list in the Labels menu, or in the right-click menu of the listing,
opens the Labels List.
Group - the set of labels in effect. The buttons beside it:
 renames the
set,
 adds a new empty set and
 deletes the set. The last line,
ROM labels (read-only), lists the ROM labels: picking it leaves the
set in effect as it was.
The field under it filters the list: only labels that contain what you type are shown. The case of the letters matters.
The list shows each label’s address and name. Double-click a label, or select it and press Enter, and the listing goes there; to a label in a ROM that is not paged in, where that ROM runs.
Convert address to CPU address space - shows where the CPU sees each label now, as
CPU:8010. A label in a page that is not paged in keeps its page and offset.
Selecting a block
Many commands work on a block of memory rather than one row:
a click puts the cursor on a row and clears the selection;
drag over the rows with the left button;
Shift+click selects from where the selection started, or from the cursor row, to the row clicked;
a click with the middle button clears the selection.
A block takes in the rows from the first byte of the first row to the first byte of the last row. The DUMP panel shares the same selection. The selection is cleared each time the Debugger opens.
With a block selected:
 View marks every byte of the block, if the cursor row is inside the
block;
Disasm to file saves just the block;
Ctrl+C copies the block as assembler text, ready to paste into a source file. With no block, it copies the cursor row;
Fill… in the
 Tools menu opens with the block’s start and end filled
in (see DUMP panel).
How memory is shown
Each byte of memory can be marked as code or as one kind of data, and the listing shows it
that way. Select a row or a block, then pick from View in the toolbar or
the right-click menu:
Item |
Shown as |
|---|---|
Opcode |
instructions |
Byte |
|
ASCII |
|
Word |
|
Address |
|
Memory not marked yet is shown as instructions. How many bytes go on a DB row, words on a
DW row and characters on a text row is set by DB in row, DW in row and
Max text length on the Debugger page of Options. A label always starts a new row.
The marks belong to the memory itself, not to an address: a mark on RAM page 3 moves with the page wherever it is paged in. Labels and comments belong to the memory the same way.
Runtime mapping in the Options menu marks memory as the program
runs: every byte the CPU runs as an instruction becomes Opcode, and every byte it reads
or writes as data and that has no mark yet becomes Byte. It works while the machine
runs, after the Debugger is closed. Play the program for a while, open the Debugger again,
and the data shows as data. Clear mapping removes every mark, the ones you set too,
after asking.
The marks, the labels and the comments are kept together in a memory map file: see Memory maps.
The toolbar
Button |
What is in it |
|---|---|
|
Fetch break, Read break, Write break for the cursor row or the block. See Breakpoints panel |
|
Show labels, Load labels, Save labels, Labels list |
|
Opcode, Byte, ASCII, Word, Address |
|
running the program step by step, see Debugger |
|
Search, Fill…, Sprite scanner (see DUMP panel), Keyboard, Watcher |
|
how the listing looks and works, see below |
HEX or DEC |
hex or decimal numbers, see Hex or decimal |
|
Reload snapshot & labels |
|
Disasm to file, Load dump, Save dump, Load map, Save map |
 Breakpoints
 Trace
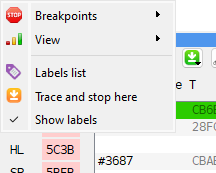
A right-click on the listing opens a shorter menu: Breakpoints, View, Labels list, Trace and stop here and Show labels.
Saving the listing
Disasm to file in the  floppy disk menu writes the listing to a text file
you name: the selected block, or all 64K with nothing selected. The file starts with an
ORG line; labels are written as name:, comments as they are, instructions after a tab.
A ROM label or a system variable the instructions use is written by its full
name and gets an EQU line before the ORG, as BASIC48.LD_BYTES EQU 0x0556; if a label
of yours in the block has its name, the instructions get its address instead. An assembler can read the file back.
Ctrl+C copies the same text for the block, without the first line.
Memory maps
A memory map, a .xmap file, keeps what you have worked out about a program:
how each byte of RAM, ROM and a cartridge is shown, code or data;
every set of labels;
the comments.
Save map and Load map in the floppy disk menu write and read it.
Loading a map replaces all label sets and comments. Comments are only kept in a memory map,
never in a labels file, so save a map when you have written comments. A map does not hold
breakpoints: they have a file of their own (see
Breakpoints panel).
From the command line, --xmap loads a map at start (see
Command line).
Reload snapshot & labels
The  button with the circular arrows opens the last file again, the way it
was opened (see Opening a file), and reads again the labels file you loaded.
Then the listing goes to PC. Use it after building a new version of your program: the new
code and its new labels come in with one click. The Reload file hotkey does the same;
no key is set for it by default.
Example: label your own routine
On a 48K, at the BASIC prompt:
Open the Debugger: Tools > Debugger.
Press G, type
8000and press Enter. The listing starts at 8000.Double-click the command of the 8000 row, type
call #8010and press Enter. The cursor moves to the next row: press Enter, typeretand press Enter again.Press G, type
8010and press Enter.Double-click the address of the 8010 row, type
beep_itand press Enter.
A bold beep_it row now stands above 8010. Go back to 8000: the row reads
CALL beep_it. Put the cursor on it and use Jump to operand: the listing goes to
beep_it. Return brings you back.
Example: mark a table as data
A table of bytes in the middle of the code shows as nonsense instructions. To show it as data:
Find the start of the table in the listing.
Ctrl+click its first row, then Shift+click the last row of the table.
Right-click inside the block and choose View > Byte.
The rows become DB #nn,#nn,..., eight bytes a row. If the end of the table still shows as
an instruction, the last row you selected was an instruction of several bytes, and only its
first byte was marked: select the rows still wrong and choose View > Byte again. A
table of addresses reads better as View > Address, and a message as View > ASCII.
Save a memory map (Save map) to keep the marks for the next time.