Machine page
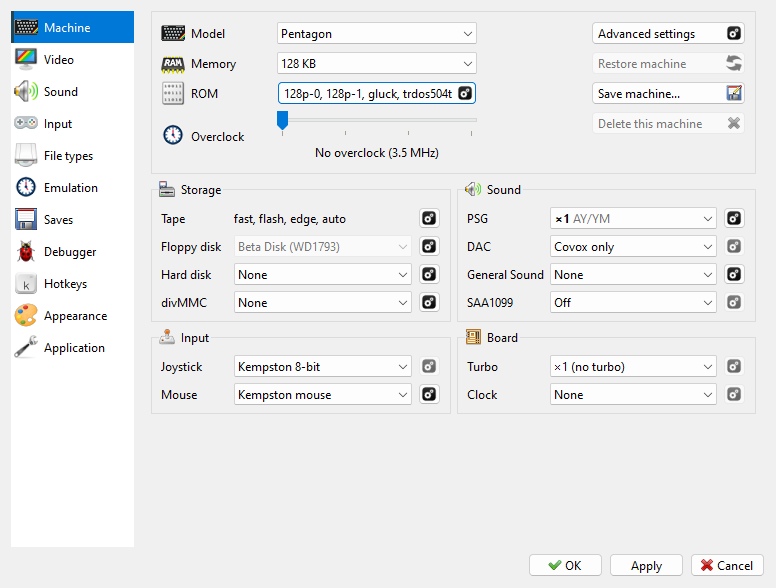
This page sets up the running machine: Model, Memory, ROM and the Overclock
slider at the top, then its devices in four groups - Storage, Input, Sound and
Board. The  gear beside a device opens the rest of its settings.
What you change here is kept for this machine only.  Save machine…,
 Restore machine and
 Delete this machine are explained
in Your own machines.
Tools > Options… opens Options; Machine is its first page. At the top:
Model - the machine.
Memory - how much RAM the machine has.
ROM - the ROM files in use; the
button opens Machine: ROM.Overclock - the slider described in Overclock.
- Advanced settings - opens Machine: Advanced Settings (see
Advanced settings).
- Restore machine, Save machine…,
Delete this machine - see Your own machines.
Below them are the machine’s devices, in four groups. Each row has a choice and a
gear button; the gear opens the rest of that device’s settings, in a window
named after it, such as Machine: Floppy Disk. A gray gear means the device has nothing more to
set. OK closes such a window and keeps what you set in it for Apply; Cancel (or
Esc) puts back what it showed when it opened.
Group |
Row |
What it sets |
|---|---|---|
Storage |
Tape |
loading settings; the row shows which are on (see Tapes) |
Floppy disk |
the controller: None, Beta Disk (WD1793) or +3 (uPD765); drives and the TR-DOS ROM in its window (see Floppy disks) |
|
Hard disk |
the IDE interface; Master and Slave in its window (see Hard disks) |
|
SD card |
ZX Evolution and ZX Spectrum Next only: the card in use (for the Next, see The SD card) |
|
divMMC |
48K, 128K, +2, +2A, +3 and the Pentagons: None or divMMC; RAM, EEPROM jumper and the firmware in its window (see divMMC); while it is on, the row reads divMMC (!) and the floppy and hard disk controllers are out of the machine |
|
Cartridge |
48K and ALF only: the cartridge in use |
|
Input |
Joystick |
None, Kempston 5-bit, Kempston 8-bit; not 8-bit on the Scorpion ZS 256 and Turbo+ (see Joysticks) |
Mouse |
None or Kempston mouse; sensitivity and wheel in its window (see Mouse) |
|
PC keyboard |
ATM Turbo 2+ and ZX Evolution only: which scan codes the machine gets (see Machines with a keyboard of their own) |
|
Sound |
PSG |
the AY/YM chips, from None to x3 - ZX Next; chip, clock and stereo in its window (see PSG) |
DAC |
None, Covox only, Soundrive 1.05 mode 1 or mode 2 |
|
General Sound |
None, Original or NeoGS (see General Sound); its ROM in its window |
|
SAA1099 |
Off or On |
|
Board |
Turbo |
the turbo steps: x1 (no turbo), x1, x2 or x1, x2, x4 |
Clock |
Pentagon and Pentagon 1024 SL only: None or Gluk, the clock chip Gluk Reset Service shows (see The Gluk clock); on the Pentagon 1024 SL it is part of the board |
|
ESP UART |
ZX Spectrum Next only: Not connected, ESP-01 (emulated) - the Wi-Fi module with Espressif’s AT firmware 1.7.6, on this computer’s network - or a serial port of this computer with a real module on it. In its window, Server on the network lets other computers reach a server the module opens, and a UDP link’s own port; off, only this computer reaches the server, at 127.0.0.1, and a UDP link hears only whom it sent to. On, Windows asks once whether to let Xpeccy+ through its firewall |
|
Pi UART |
ZX Spectrum Next only: a serial port of this computer for the Pi’s UART |
Changes take effect when you press Apply or  OK.
On the ZX Spectrum Next
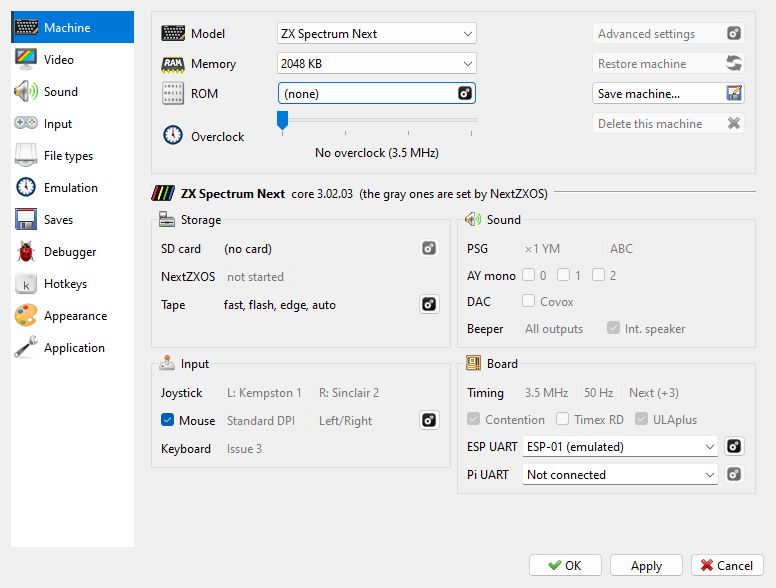
The ZX Spectrum Next sets up most of its hardware itself: NextZXOS sets it at start, from its own settings, and a program may change it as it runs. So on the Next the page shows, under a ZX Spectrum Next heading with the version of its core, groups of its own in place of the usual ones. What NextZXOS has set is grayed out; the rest is set here, as on the other machines.
Group |
What it shows |
|---|---|
Storage |
SD card, the card’s path (it is put in from the Media menu, see The SD card); NextZXOS, the version the machine runs; Tape with its settings (see Machine: Tape) |
Input |
Joystick, the left and the right one; Mouse, its DPI and buttons, with a |
Sound |
PSG: the chip, x3 with TurboSound on (all three play) or x1, and the stereo; AY mono for each chip; DAC: Covox; Beeper: where BEEP goes, and the internal speaker |
Board |
Timing: the CPU speed, 50 or 60 Hz, and the timings; Contention, Timex RD and ULAplus; ESP UART and Pi UART |
The values are what the machine has set now; hold the mouse over one to see what else it can be. To change them, press NMI, then Settings, in NextZXOS: a change made there takes effect when the menu closes. Next (+3) in Timings is the timing NextZXOS calls Next, that of the +3. Scanlines and HDMI Sound are not listed: they are for a monitor, not emulated. Advanced settings is grayed out on the Next.
Overclock
Overclock on the Machine page of Options is a slider for the CPU’s clock: No overclock, then Overclock x2, x4 and x8. The CPU runs faster, while the frame rate stays where it was. To slow the whole machine down or speed it up, frames and sound included, use Slow Motion and Fast Forward (see Speed and time).
No real machine ran faster than 14 MHz, so past that the timing of a program is not guaranteed. The slider is not saved: the next start is without overclock. The Overclock Up and Overclock Down hotkeys move it too.
Advanced settings
Advanced settings, the first button in the right-hand column of the
page, opens Machine: Advanced Settings. It holds the settings of the hardware itself, not
of how you use it. Leave them alone unless you know the hardware.
CPU - Base clock, the frequency of the crystal the board runs on. The frame rate is derived from it too.
ULA - Raster layout (the size of the frame and where the interrupt falls in it), ULA pattern, Floating bus, Ear input, and check boxes for Contended memory, Contended I/O, Early timings, 4T border, ULA snow…, …and it crashes, MIC in the beeper and ULA plus.
Board - Even M1 (Scorpion ZS 256) and DD palette (Profi).
Each one is explained beside it, or in a tooltip when you hold the mouse over it. On the ZX Spectrum Next the button is grayed out: the Next sets them itself (see On the ZX Spectrum Next). What contention, snow and the floating bus are, and how they are emulated, is in Contention, snow and the floating bus.
Machine: Tape
On the Machine page of Options, the Storage group has a Tape row. It sums
up the settings: plain, or the ones that are on: fast, flash, edge,
auto. By default all four are on. The button at the end of the
row opens the Machine: Tape sheet:
Playback speed;
Auto play / stop;
Rewind at end, and under it Next tape of a set: at its end a tape of a set goes on to the next one (on by default), or, off, starts over itself;
Fast loading, Flash loading and Edge detection.
Playback speed, Auto play / stop, Rewind at end, Next tape of a set
( Autoreverse there) and Fast loading are also in the
Tape Player, where a change takes effect at once.
The tape’s loudness is Tape in the Volumes group of the Sound page (see Sound page).
Machine: Floppy Disk
The gear in the Floppy disk row of the Machine page opens
Machine: Floppy Disk:
Fast disk access - no waiting for the head to move or the disk to turn; see Fast Disk Access.
Add boot loader - see The boot file.
TR-DOS ROM - which ROM image the Beta Disk runs.
Interleave - the order of sectors on each track of a
.trdor.sclimage, set when the image is opened. TR-DOS formats its own disks as 1, 9, 2, 10…Number of drives - from one (A) to four (A to D); a +3 has two at most. A drive left out is not there at all, and programs find it missing.
Drives - for each drive, 80 cylinders and Double side.
Sound devices
The Sound group on the Machine page of Options lists the sound devices of
the running machine. Each machine keeps its own devices: a change here applies to this
machine only. The button with the gear at the end of a row opens the
device’s further settings. How loud each device plays is set on the
Sound page.
PSG
The PSG is the sound chip most music on the Spectrum is written for. The PSG row sets how many of them the machine has:
Choice |
What you get |
|---|---|
None |
no sound chip |
x1 - AY/YM |
one chip, three voices - the 128K machines and most clones |
x2 - TurboSound |
two chips, six voices, for music written for TurboSound |
x2 - TurboSound FM |
two YM2203 chips: TurboSound with FM synthesis, for music written for TurboSound FM |
x3 - ZX Next |
three chips, nine voices |
A program written for one chip plays on the first chip of two or three, and sounds the same.
The gear opens Machine: PSG:
Chip - AY-3-8910 or YM2149. The two sound alike; the YM2149 plays volume envelopes in finer steps. YM2203 is the chip of TurboSound FM: choosing x2 - TurboSound FM sets it, and the list is then grayed out.
Clock - the chip’s clock in MHz, which sets the pitch. Auto is half the machine’s base CPU clock, as the boards divide it, and the list shows the resulting value. 1.773447 is the clock of the ZX Spectrum 128, +2 and +3; 1.75 that of most clones. Music written for one of them sounds a little out of tune on the other. You can also type a clock of your own.
Stereo - Mono, or the order of the three voices from left to right: ABC, ACB, BAC, BCA, CAB, CBA. ABC puts the second voice in the middle; ACB puts the third voice there.
Separation - how far apart the left and right sides are: 100% keeps them fully apart, 0% is mono. It is grayed out with Mono.
DAC
A DAC plays digitized sound - speech, drums and samples - written to a port byte by byte:
None - no DAC;
Covox only - one mono channel on port #FB;
Soundrive 1.05 mode 1 - four channels, two on each side, on ports #0F, #1F (left) and #4F, #5F (right);
Soundrive 1.05 mode 2 - the same four channels on ports #F1, #F3 (left) and #F9, #FB (right).
Pick the one the program is written for.
General Sound
A sound card with a processor and memory of its own, which plays music modules and samples for the programs written for it. The row puts one in the machine:
Original - the card as X-Trade made it. A change of a channel’s volume clicks, as on the card, and each side carries some of the other;
NeoGS - the card NedoPC makes today: up to 8 channels, 4 MB of memory, no clicks, and its own firmware. Programs written for the NeoGS find it. Its SD card slot and MP3 chip are not there yet. The ZX Evolution machines come with one.
The gear opens Machine: General Sound:
ROM - the card’s own: the Original’s ROM of this machine, or the NeoGS flash image, which every machine shares; another NeoGS image starts the card afresh. Picked from the list or from a file with the
 folder button;
Separation - how far apart the two sides are, as for the PSG: at 100% each card sounds as its own circuit mixes it, at 0% it is mono. 75% at first;
Reset - the card is reset together with the machine.
SAA1099
A sound chip with six voices, found on some sound cards for the Spectrum. On puts it in the machine.
The Gluk clock
A clock chip that Pentagon owners added to their boards, made for Gluk Reset Service, the service ROM of the Pentagons. The Pentagon 1024 SL has it on the board; on the Pentagon set Clock to Gluk to fit it. Gluk then shows the time and date in its menu, and a reset to Service with S held down opens its CMOS Setup. The time is your computer’s. Gluk keeps its own settings in the chip, such as the drive and the turbo (see Turbo Mode).
Your own machines
A change you make to a machine stays with that machine. It is saved when you apply it and when you switch to another machine, so when you come back to that machine, you find it as you left it. Each machine keeps its own: memory, the ROM set and the marked ROM, base clock, turbo steps, the Advanced settings, and its devices - disk interface and number of drives, hard disk interface, PSG, DAC, General Sound, SAA1099, clock, joystick, mouse and PC keyboard. The other settings on the page, such as the tape settings, are the same for every machine.
A built-in machine you have changed gets an asterisk after its name. It still gets the fixes that a new version of Xpeccy+ brings, in every setting you did not change.
The three buttons on the Machine page:
- Save machine… saves the current settings as a new machine under a
name you give (Xpeccy+ suggests the machine’s name with
(mine)after it). The new machine appears in the machine list and runs at once. It is based on the machine it was made from, so it too gets that machine’s fixes in every setting you did not change. The name must be one no other machine has. - Restore machine undoes every change. A built-in machine goes back to
its original settings; one of your own goes back to the settings of the machine it was
made from, and stays in the list.
- Delete this machine removes a machine of your own, after asking, and
switches to the one it was made from. Built-in machines cannot be deleted: use
Restore machine.
Each machine you have changed or made is a small text file in the machines folder of the
settings folder (see Where the settings are).
It holds only what differs from the machine it is based on. Deleting the file of a built-in
machine, with Xpeccy+ closed, does the same as Restore machine.
Export settings… on the Application page exports your own
machines together with the settings.
ROM images
The ROM images are in the roms folder of the settings folder. Xpeccy+ comes with every
image its machines need. The images come under their own license terms: LICENSE and
PROVENANCE.md in the same folder say where each one came from.
To replace a ROM for every machine that uses it, put your file into roms under the same
name. On Linux and macOS a new version of Xpeccy+ adds the images it is missing but never
overwrites one that is already there, so your file stays.
To give one machine a different ROM, click the ROM button on the
Machine page. The Machine: ROM window lists the machine’s ROM banks, named after
what is in each, such as ROM 0 (Basic 128):
pick a file from the list, which holds every
.romand.binfile in theromsfolder;or click the
folder button beside it to pick a file from any folder;mark the bank a plain reset starts from (Boots from the marked ROM).
Font is the text-mode font, for the machines that have one. The General Sound ROM is in the Machine: General Sound window, and the TR-DOS ROM in Machine: Floppy Disk.
Expert settings opens Machine: ROM Files, the same ROM set shown
file by file: where each part starts in its file, how much of it is read, and where it is
placed in the machine’s ROM. Its buttons  add a file,
 edit or
remove the one selected, and
 fill the set with the machine’s
standard ROMs again. Adding or editing opens the Romset Editor with File,
File offset, Size (0 reads to the end of the file) and ROM pos, all in KB.
The new ROM is in place when you press Apply. Reset the machine to start from it.
If a ROM file cannot be read - moved, deleted or on a disk that is not there - Xpeccy+ says which, and the machine runs with that bank empty.